
Voicing the Cheshire Cat
tutorial
A multi-container application that allows the Cheshire Cat to talk!
Giving voice to your favorite chatbot can increase the quality of the interaction by introducing a high degree of personalization to it.
In this tutorial we will see how to build a multi-container application for voicing the Cheshire Cat. Along with the Cat docker image, we will use two custom images for text-to-speech conversion and audio generation.
These two images are intended for stand alone use and therefore you can easily integrate them into other projects!
You can find the official repository of this tutorial here. In any case, here we give you a full description of how the application works and how to run it properly.
Features
-
Modular design: The multi-container application is designed with modularity in mind, making it adaptable for use in various chatbot scenarios beyond the Cheshire Cat project.
-
No audio file is stored anywhere: The audio is generated “on the fly”.
-
Multi-speaker: Different speakers available.
-
SpeechT5 model running inside: SpeechT5 is a transformer-based architecture capable of performing different audio task. In this project we intend to employ this model for the text-to-speech task.
-
No external API for text-to-speech: The SpeechT5 model runs locally.
Requirements
-
Docker: You can install it from the official web site.
-
Pulseaudio: Pulseaudio is a sound server system for Unix-like operating systems but you can use it also on Windows. We will describe below how to install it for Windows.
Pulseaudio for Windows
-
download the zip file here, extract and place it in a folder of your choice.
-
go to the etc/pulse/daemon.conf file, uncomment and set the “exit-idle-time” parameter equal to -1.
-
go to the etc/pulse/default.pa file, search for “load-module module-native-protocol-tcp”, uncomment it and on the same line add “listen=0.0.0.0 auth-anonymous=1”.
-
open Windows PowerShell, move to the previous chosen folder and run:
.\pulseaudio-1.1\bin\pulseaudio.exe --use-pid-file=false -D
Congratulations! Now you should have Pulseaudio running on your pc. If you’d like, in the audio generation image overview you can find the same procedure just described here along with a simple stand-alone tutorial for generating audio from a generic numpy array.
How the application works
This simple image illustrates how the application we are building works:
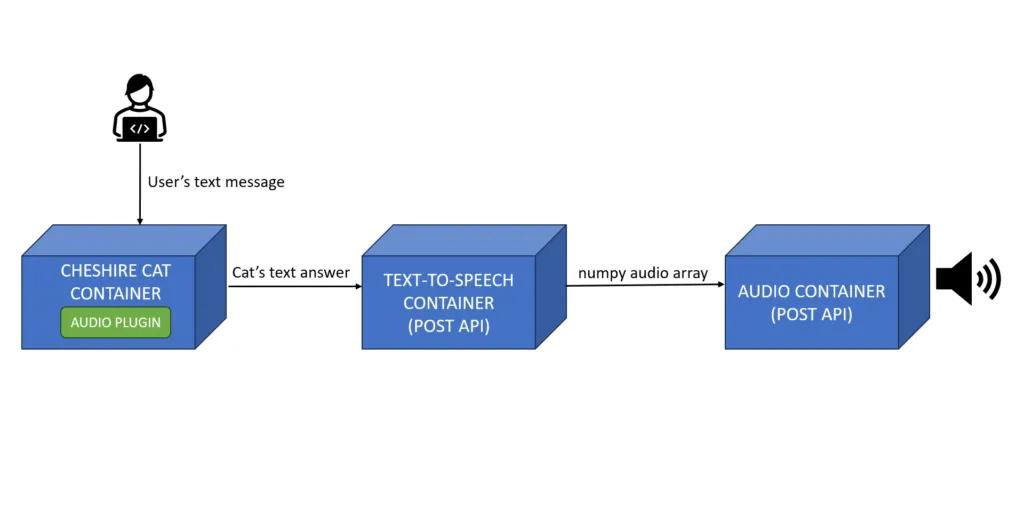
The application workflow. The Cheshire Cat container receives a text message from the user, the LLM generates the answer and the audio plugin sends it to the text-to-speech container via POST API. Here the SpeechT5 model converts the Cat’s answer into an audio array and the audio container generates audio from it.
Let’s build!
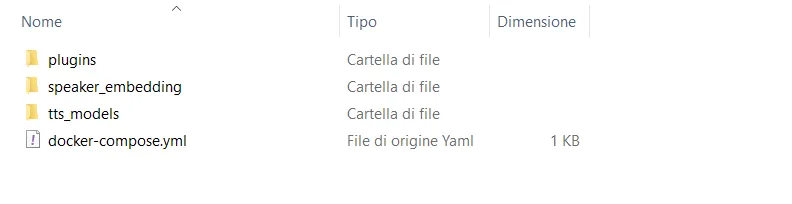
To get started, create a project folder with the following internal structure:
-
a plugins folder
-
a speaker_embedding folder
-
a tts_models folder
-
a docker-compose.yml file
Plugin
In plugins we create a simple plugin that will send the Cat’s anwers in text format to the text-to-speech container. In case you don’t know how to write a plugin, we recommend you read this simple tutorial.
Here is the code for the plugin:
from cat.mad_hatter.decorators import hook
import requests

API_URL = "http://container_tts:1000/tts"

@hook
def before_cat_sends_message(message, cat):
    #send the cat answer to container_tts for text-to-speech
    payload = {"text":message["content"]}
    resp = requests.post(API_URL, json=payload)

    return message
Speaker embeddings
Download the numpy arrays you want from here and put them in speaker_embeddings. These arrays, known as x-vectors, represent the vocal characteristics of a speaker. The SpeechT5 model uses the x-vectors to generate audio with the corresponding speaker’s voice.
Text-to-speech models
When you start the application for the first time, you will find the text-to-speech model in tts_models. If you want to understand how the SpeechT5 model works for text-to-speech (and more!), you can read this article.
Docker compose file
Connect all the containers with a docker-compose.yml file. Here is how the file looks like:
version: '3'

networks:
  audio_for_cheshirecat:
    driver: bridge

services:

  cheshire-cat-core:
    image: ghcr.io/cheshire-cat-ai/core:latest
    container_name: cheshire_cat_core
    ports:
      - ${CORE_PORT:-1865}:80
    environment:
      - PYTHONUNBUFFERED=1
      - WATCHFILES_FORCE_POLLING=true
    networks:
      - audio_for_cheshirecat
    volumes:
      - ./static:/app/cat/static
      - ./plugins:/app/cat/plugins
      - ./data:/app/cat/data

  container_audio:
    image: alessio21/play-numpy-array
    ports:
     - "2865:2865"
    networks:
      - audio_for_cheshirecat

  container_tts:
    image: alessio21/text-to-speech
    ports:
     - "1000:1000"
    volumes:
     - ./tts_models:/app/models
     - ./speaker_embedding:/app/speaker_embedding
    environment:
      - SPEAKER=slt
      - API_URL=http://container_audio:2865/send_array
    networks:
      - audio_for_cheshirecat
Use the SPEAKER environment variable to change the speaker embedding: you can set its value with one of the numpy filenames available in speaker_embeddings.
How to run
From the command prompt, move to your project folder and run:
docker compose upOnce all the services have been launched, go to http://localhost:1865/admin, select your preferred language model and activate the audio plugin.
Enjoy listening to the Cat!
Your application is working, chat with the Cat and listen to its answers!
