
Easy-to-use setup to extend the Cheshire Cat Docker configuration and run a local model with Ollama.
If you’re interested in having the Cheshire Cat running a local Large Language Model (LLM), there are a handful of methods available. These are:
- serving the LLM behind your own custom API;
- using the text-generation-inference service from HuggingFace;
- composing the Cat’s containers with the llama-cpp server;
- composing the Cat’s containers with Ollama.
In this tutorial, we’ll focus on the last one and we’ll run a local model with Ollama step by step. For a ready-to-use setup, you can take a look at this repository.
TL;DR
Please, notice that there may be multiple ways to integrate the Cheshire Cat’s and Ollama’s containers. However, this mostly depends on your need and deepening the Docker configuration is out of this article’s scope. Therefore, we’ll setup a multi-container application adding the Ollama’s container to the Docker’s internal network and exposing a port to allow the Cat interacting with the local model.
Setup Ollama
The Ollama’s Docker configuration looks like the following:
ollama:
container_name: ollama_cat
image: ollama/ollama:latest
volumes:
- ./ollama:/root/.ollama
expose:
- 11434
# The lines below are needed to allow Docker
# seeing the GPU. If you have one, uncomment them
# environment:
# - gpus=all
# deploy:
# resources:
# reservations:
# devices:
# - driver: nvidia
# count: 1
# capabilities: [gpu]Code language: YAML (yaml)As anticipated in the comment, if you plan to use your GPU (Nvidia only!), you need to uncomment the ending part of the snippet. For this article, we’ll experiment using only the CPU.
Therefore, the complete configuration will look like this:
version: '3.7'

services:
  cheshire-cat-core:
    image: ghcr.io/cheshire-cat-ai/core:latest
    container_name: cheshire_cat_core
    depends_on:
      - cheshire-cat-vector-memory
      - ollama
    environment:
      - PYTHONUNBUFFERED=1
      - WATCHFILES_FORCE_POLLING=true
      - CORE_HOST=${CORE_HOST:-localhost}
      - CORE_PORT=${CORE_PORT:-1865}
      - QDRANT_HOST=${QDRANT_HOST:-cheshire_cat_vector_memory}
      - QDRANT_PORT=${QDRANT_PORT:-6333}
      - CORE_USE_SECURE_PROTOCOLS=${CORE_USE_SECURE_PROTOCOLS:-}
      - API_KEY=${API_KEY:-}
      - LOG_LEVEL=${LOG_LEVEL:-WARNING}
      - DEBUG=${DEBUG:-true}
      - SAVE_MEMORY_SNAPSHOTS=${SAVE_MEMORY_SNAPSHOTS:-false}
    ports:
      - ${CORE_PORT:-1865}:80
    volumes:
      - ./cat/static:/app/cat/static
      - ./cat/public:/app/cat/public
      - ./cat/plugins:/app/cat/plugins
      - ./cat/metadata.json:/app/metadata.json
    restart: unless-stopped

  cheshire-cat-vector-memory:
    image: qdrant/qdrant:latest
    container_name: cheshire_cat_vector_memory
    expose:
      - 6333
    volumes:
      - ./cat/long_term_memory/vector:/qdrant/storage
    restart: unless-stopped

  ollama:
    container_name: ollama_cat
    image: ollama/ollama:latest
    volumes:
      - ./ollama:/root/.ollama
    expose:
      - 11434
#    environment:
#      - gpus=all
#    deploy:
#      resources:
#        reservations:
#          devices:
#            - driver: nvidia
#              count: 1
#              capabilities: [gpu]Code language: YAML (yaml)
You can place the configuration above in a docker-compose.yaml file. Thus, run:
docker compose up
# if you have an older version of Docker compose
# docker-compose up Code language: PHP (php)
Setup the Local Model
After starting the containers, there are two steps missing to have your local model running:
- Download the LLM you prefer;
- Setup the LLM in the Cat.
Download the Model
There is a list of available models on the Ollama website. For demonstration purposes, we’ll use a 2 Bit quantized version of Mistral 7B, but you can choose the one you prefer.
To download the model, you should run the following in your terminal:
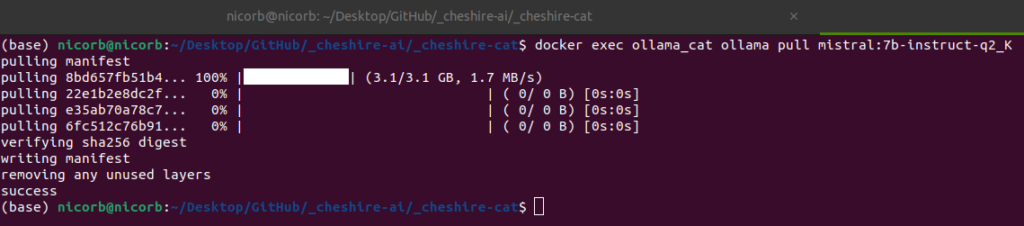
docker exec ollama_cat ollama pull mistral:7b-instruct-q2_K
# replace the <model:tag> name with your choiceCode language: PHP (php)
Once done, you can expect to see something like this in the terminal:
Setup the Model
At this point, you only miss to setup the LLM in the Cat. Thus, open the Admin panel of the Cat and navigate to the “Settings” page; click on Configure on the “Language Model” side and setup the Cat like follows:
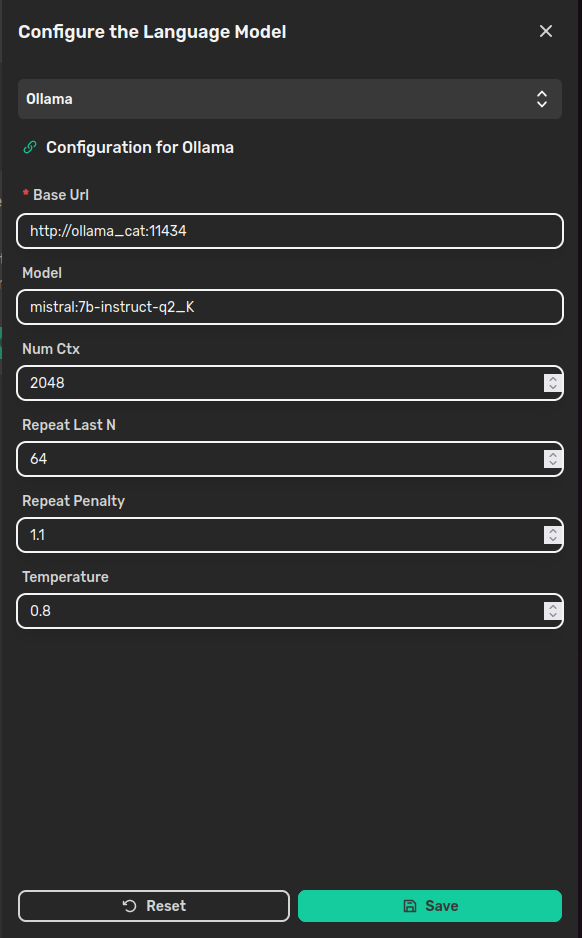
In the Base Url field, there is the address pointing to the Ollama’s container, where “ollama_cat” is the container’s name we wrote in the docker-compose.yaml and 11434 is the exposed port. In the Model field, there is the <model:tag> pair you used to download the model.
The other parameters are:
- Num Ctx: the context window size to generate the next token;
- Repeat Last N: how far back the model should look back in the sentence to prevent repetition;
- Repeat Penalty: how strongly to penalize repetitions. Higher values penalize more;
- Temperature: how creative the answer should be. The higher the more creative.
Time to Chat!
That’s it! You’re done configuring your local model with Ollama and it’s time to start developing a plugin.
Nicola Corbellini is a PostDoc Researcher at the InfoMus Lab, Casa Paganini, within the DIBRIS department of the University of Genoa. His research focuses on Social Signal Processing, with interests in Hybrid Intelligence and Multimodal Human-Computer Interaction.
Beyond academia, Nicola works as a software developer and has a keen interest in interactive generative visual and new media art.